El Orfanato (2007) DVDRip en mediafire


TITULO EN CASTELLANO: El Orfanato
PAÍS: España
DIRECTOR: Juan Antonio Bayona
GUIÓN: Sergio G. Sánchez
REPARTO: Belén Rueda, Fernando Cayo, Géraldine Chaplin, Roger Príncep, Mabel Rivera, Montserrat Carulla, Andrés Gertrúdix, Edgar Vivar
Sinopsis: Laura regresa con su familia al orfanato en el que creció de niña, con la intención de abrir una residencia para niños discapacitados. El nuevo entorno despierta la imaginación de su hijo, que comienza a dejarse llevar por juegos de fantasía cada vez más intensos. Éstos van inquietando a Laura cada vez más, hasta el punto en el que llega a pensar que hay algo en la casa que está amenazando a su familia. A ella le ocurre algo extraordinario y, a pesar de que es una mujer con unos principios muy claros, su universo se tambalea poniendo en duda todo aquello en lo que creía...

DESCARGA
Son 4 Partes de 85.8 MB y 1 de 8.8 MB

Need for Speed Carbon Español (PC-GAME) en mediafire

Datos Técnicos

Need for Speed Carbon Español (PC-GAME)3.96 Gb RAR ISO Medicina Incluida Español ISBN 13: 9788478887927 EA Games

Descripción
Carbono es la nueva y esperada entrega de la serie Need for Speed. Si la anterior entrega, Most Wanted, introdujo una nueva serie de conceptos en la historia, en la forma de competir y en el aspecto gráfico, Carbono lo lleva un paso más allá y mezcla todo lo bueno de Most Wanted, añadiendo novedades importantes y un nuevo sistema de personalización muy avanzado.
Carbono cuenta con una nueva historia y con una nueva forma de jugar. Ahora no eres un conductor solitario, sino el líder de toda una banda. Has estado ausente de la ciudad en la que se desarrolla el juego y tendrás que competir por conquistarla de nuevo. Conquista sector a sector la ciudad con los habituales modos de competición: carrera, aceleración y el regreso de uno de los preferidos por muchos usuarios: derrape, donde no vale la velocidad, sino tu estilo.
Además, para conquistar finalmente cada sector no sólo debes ganar cada una de estas carreras con la ayuda de tu banda - puedes llamar a un compañero para que te ayude durante la carrera, mediante una nueva tecla- sino que también superarás una última fase: un enfrentamiento con el líder del sector. Una carrera peligrosa en los cañones que rodean la ciudad y en la un solo error te puede llevar al fondo del precipicio. Todo un desafío, incluso para los mejores conductores.
A estas novedades en la jugabilidad hay que añadir el nuevo sistema de personalización. Hasta ahora escogías, por ejemplo, un tipo de llanta de entre diferentes marcas. Sin embargo, en Need for Speed Carbono puedes modificar esas ruedas como a ti te gusta y con diferentes zonas para obtener un resultado mucho más personal.Finalmente, Need for Speed Carbono utiliza una versión mejorada del impresionante motor gráfico de Most Wanted para ofrecerte las carreras más realistas y espectaculares de la serie, gracias, sobre todo, a que es de noche y los diseñadores han utilizado la iluminación de formas muy creativas a lo largo de toda la carrera.
Capturas

Descargar:


Adobe Photoshop CS2 ESPAÑOL con Menú en mediafire

el Photoshop CS2. es el más fácil qué he usado te sale como con un Menú para Instalarlo muy Practico

Incluye:
• Adobe Photoshop CS2 en Español.
• Tutorial de 3 simples pasos para instalar.
• Actualización a la versión CS2 9.0.1.
• Manual de Uso en Español (748 páginas).
• Menú Autoejecutable.

Idioma: Español
Tamaño: 220 MB
Formato: ISO
Compresión: RAR 2 Partes de 90 MB y 1 de 9.42 MB
pass :www.warianos.cl

importante: Imágen ISO significa que cuando le den doble click se abrira su nero para quemar un CD de instalación.

Imperium III

Requisitos mínimos
-Windows 98/Me/XP
-Pentium III 600 MHZ
-Tarjeta gráfica de 2 Mb
-Monitor de 1024×768 de resolución
-1Gb de espacio libre en el disco duro
-CD-ROM 4x-Tarjeta de sonido

Captura:

Descarga: 6 de 100 Mb y una de 50 Mb
Descargar:
Carpeta donde estan todos los links:http://www.mediafire.com/sharekey=b...37669b29717975

Partes:


Windows XP Service Pack 3 Estilo MAC Español

Descripción :

Esta version es un XP con SP3 totalmente en Español sin traducciones ni nada. Posee SERIAL de ORO. Los Principales cambios son la integración del SP3 y la de los Drives SATA y RAID. El estilo visual de MAC con todos los componentes de instalacion MANUAL asi cada uno elige que cosas quiere y que no pero el resto de programas se isntalan de forma desatendida como siempre. Lleva integrado el WMP11 y el IE7 que se isntalan solos por defecto asi como tambien la licencia de ORO y modificaciones en el registro y soporte para TEMAS de XP como tambien asi las conecciones de red estan multiplicadas x16000.
Dentro encontraremos tambien unas pequeñas indicaciones para hacerlo mas rapido y sobre el NOD32 y su activacion.
Otra cosa importante es que lleva un pack de controladores para los chipset SATA / RAID que últimamente son tan comunes.

Los Requerimientos:
Esta vez se recomienda tener 256 de Ram para correrlo bien pero todo depende los efectos de MAC que pongamos.Fue testeado en varias maquinas instalado FULL FULL con 256 de Ram.

Programas:
. Net Framework 1.1 SP1 (+Up)
. Net Framework 2 (+Up)
. Adobe Reader 8 (Lite)
. VLC Player
. CCleaner 2.07
. UltraISO
. DVD Shrink
. Everest Ultimate Edition
. Internet Explorer 7 (+ 4 Up) Autoinstalado por defecto
. Java RE Version 6 Up2
. K-Lite Codec Pack Standard
. Live Messenger 8.5
. Msn Plus + Clonador (Abrir varios Msn)
. Microsoft Office 2003 SP3 (OGA + Up)
. Mozilla Firefox 2.0.0.14 + Plugins
. Nero Burning Rom 8.3 Lite
. NOD32 Antivirus System 3.0.650
. Windows Media Player 11 Autoinstalado por defecto
. PowerDVD 7 Deluxe
. Shockwave 10
. TuneUp Utilities 2008
. Unlocker
. uTorrent 1.7.7
. Winamp 5.3 Pro + MMD3 Theme
. WinRAR 3.71
. Mac Transformation Pack (Instalacion Manual)
. Ares 2.0.9
. Flash 9

Tweaks (Modificaciones de Registro Opcionales):
- Desactivar la barra de idioma
- Activar Auto-Arranque CD/USB
- Activar carpeta TEMP clásica
- Activar la cuenta de Administrador
- Activar Restaurar Sistema
- Activar IMAPI - Grabador Windows XP

Importante
El Firewall viene desactivado como tambien las Actualizaciones Automaticas pero pueden activarlas.Se recomienda isntalar todos los programas que necesitamos y reinicia. Luego recien instalar el Mac Transformation.No se recomienda instalar todas/muchas aplicaciones (si quiere rendimiento), solo lo que utilizamos.Encontrara una descripción de cada programa en WPI, pasando el ratón por encima.Si no utilizamos todos los efectos visuales del Windows se recomienda desactivarlos desde MI PC-PROPIEDADES-OPCIONES AVANCADAS-RENDIMIENTO-CONFIGURAR desactivar todos menos los 4 ultimos para un mejor rendimiento.
Capturas:

Descarga:

Eagle Eye (2008)


Reseña:

Jerry Shaw (Shia LaBeouf) y Rachel Holloman (Michelle Monaghan) son dos desconocidos que se encuentran por culpa de una misteriosa llamada de teléfono de una mujer a la que no conocen. Amenazando sus vidas y a sus familias, consigue que Rachel y Jerry se metan en situaciones cada vez más peligrosas, utilizando la tecnología de la vida cotidiana para seguir todos y cada uno de sus movimientos. A medida que las cosas se complican, estas dos personas normales y corrientes se convierten en los fugitivos más buscados de USA, y tienen que colaborar para averiguar qué está pasando en realidad y, lo que es aún más importante, por qué.


Ficha Tecnica:

Titulo: Eagle Eye (2008)

Genero: Acción, thriller.

Duración: 01h 52min aprox

Idioma: Inglés con subtitulos en español incorporados.

Tamaño: 404 MB aprox

Formato: RMVB

Hosting: MediaFire y rapidshar

Calidad de imagen: R5


Driver compaq presario F754LA y F752LA


drivers de video Geforce go 7000m
Drivers de LAN
WIFI
1.- Audio
- Controlador de Bus Microsoft Universal Audio Architecture (UAA) para audio de alta definición (en caso que no reconozca el audio como High Definition)
2.- Driver
les funcionan con presario f752la

Tu página web: la base


La primera parte de este manual será la página web. Es aquí dondeempieza todo y es realmente complicado hacer negocios en Internet sin tenerla.
Pensemos en la frase 'navegar por Internet'. Esto alude al hecho de que tanta gente llega a una página web, echa un vistazo y se larga a otro sitio fácilmente.
Si tú no tienes algo para retener a ese visitante lo habrás perdido, para siempre probablemente. Hoy en día hay cientos de miles de páginas web, por lo tanto es importantísimo que la nuestra sea mejor que las demás.
Diseño:
Veamos cuáles son los principios de una buena página web
* Tiene que estar bien organizada y fácil de usar. Mantén tu página principal (la página de entrada a tu página web) simple, con el diseño de la tabla de contenidos simple y fácil de usar. Usa palabras simples y párrafos cortos para mantener al visitante interesado.
* Fácil de navegar. Pongamos iconos o links (enlaces) a la página principal en todas las sub páginas, así la gente no necesita usar el botón de adelante y atrás en el navegador.
* Poner alternativas de texto en nuestros gráficos para que se visualicen mientras se cargan los gráficos. Hay gente que navega también con la característica de no ver gráficos para agilizar las cargas de las páginas web.
* Simplicidad. Es importante mantener un lenguaje sencillo para que lo pueda entender cualquiera.

No debemos tratar de impresionar a nadie con vocablos altisonantes. La principal misión es comunicar, no mostrar lo sofisticados que somos y las palabras tan complicadas que sabemos usar, eso hará que mucha gente se desconecte, con lo cual perderemos visitantes.
Podemos tener un gran producto o servicio, pero nadie lo comprará si no saben claramente lo que tú ofreces o no pueden entender el beneficio que ellos obtendrán si lo compran. Cuando alguien visita nuestra página web no tienen ni idea de quién somos o qué ofrecemos. Es nuestra obligación dejar esto bien claro en un período de tiempo muy corto.
Es mejor pasarse aclarando cosas que quedarse corto. Pongamos frases cortas y precisas con un diseño consistente (parecido) en todas las subpáginas.
* Tiempo de carga rápido. Todo el mundo no está usando un módem de 56k o una línea digital. La mayoría están usando modems de 28k y mucha gente de 14k.
¿Esperarías cuatro o cinco minutos a que una página web se cargara cuando tienes tantas otras opciones para visitar? Por supuesto que no. La página de Yahoo! (c) tarda 6 segundos en un módem de 28k, es la página más visitada de la web, entre otras cosas por la simplicidad de diseño y por la rapidez de carga.
Usa los gráficos imprescindibles pero no dejes que predominen en tu página web. Tardan mucho en cargarse.
El factor tiempo es importante porque como dijimos antes la gente en Internet es muy impaciente. Si tu página web lleva mas tiempo de la cuenta en cargarse es muy fácil para el visitante con un par de clicks estar en otra página web de la competencia. Ajusta tu web en
http://websitegarage.netscape.com

Estos servicios te proporcionan un informe de tiempo de carga, tamaño, compatibilidad de navegadores etc.
* Contenido, información, no imágenes. Mucha gente usa gráficos animados y programas (scripts) en Java que dan una gran vistosidad y atractivo a nuestra página web.
Esto no sólo incrementa los tiempos de carga, sino que distrae al visitante de nuestro verdadero mensaje.
Estos gráficos a veces dificultan la comunicación. La gente va a Internet muchas veces por información, debemos asegurarnos que comunicamos lo que tenemos que comunicar al visitante y no llenamos nuestra página web de gráficos.
Siempre se ha dicho que una imagen vale por mil palabras, pues bien, en Internet esto no funciona.
Truco de tráfico
Vamos a ver ahora en otro orden de cosas pero dentro de lo que es el diseño de nuestra web, un truco que funciona muy bien para generar tráfico. Todo visitante de su sitio web tiene el potencial de ayudarle a generar tráfico adicional, recomendando su sitio web a amigos o conocidos. Sin embargo, muchos no lo hacen, por el tiempo que ello implica. Con este truco esta labor se vuelve muy sencilla. Basta con hacer click en
com>

Esto "construye" un email con el Asunto: Visita esta web:interesante, y en el cuerpo del mensaje ponemos nuestra web. El interesado sólo tiene que seleccionar el email del destinatario. Son las palabras las que venden, no los gráficos.
* Venta fácil. Haz que el proceso de venta sea fácil si estás vendiendo algo. Asegúrate de que dejas bien claros los beneficios de tu producto o servicio y las formas de hacer pedido están bien claras. Antes de ofrecer al visitante que nos compre tenemos que haberle dado una imagen de credibilidad y confianza. Luego hay que mostrar varias formas de pago, tanto online como tradicional.
Muchas veces el usuario quiere ver el teléfono de pedidos o la dirección sólo para coger confianza aunque luego haga el pedido online con la tarjeta. No pongas trabas. Antes en la página de Apple Ó (sí, Apple) se obligaba al comprador a bajarse un programa e instalarlo en el ordenador para efectuar el proceso de compra. Esto es echar clientes fuera. A veces las grandes empresas también tienen cosas que mejorar en sus página web.
¿Por qué unas páginas web tardan tanto en cargarse cuando hay otras que se cargan tan rápido? Esto es debido al diseño de la página web. El factor tiempo es muy importante y debemos 'aligerar' al máximo nuestras páginas web (al menos la principal, luego una vez 'enganchado' el
visitante podemos permitirnos algunos gráficos mas).
¿Cómo podemos agilizar el tiempo de carga de nuestra página web?
1.- Reduciendo el tamaño de los gráficos de nuestra página web. Hay una herramienta que nos permite reducir el tamaño de los ficheros gif optimizando los colores. Se encuentra en:

USB de voltaje y corriente Tester!

Dado que a veces es necesario para comprobar los puertos USB de tensión o si ustedes son curiosos sobre qué tipo de corriente de los dispositivos puede ser tirando, sería de gran tienen algo que comprobar estos.
Ahora puedes.
En lugar de sólo la piratería aparte cables USB y el control de estas lecturas con un Multímetro o uno de los Pen Drive damas estilo de tensión, esta instructable le dará una herramienta que es indolora para su uso. Moverse en adelante .....
* Por favor, evalúe y comentario *
Nueva edición pronto, más pequeños, tal vez incluso de tamaño de bolsillo.

Paso 1: Piezas!

Perdón, Las fotos de este paso no fue.

Lo que usted necesita:
Soldadura de hierro y la soldadura (duh) Epoxi, acuario sellador o adhesivo hit (opcional) Espuma
1 PC Bay cubrir cualquier tamaño hará
3 clavos de acabado o artículos similares a convertir en "puestos"
1 USB Extender cable, o piezas de otros proyectos;)
1 Cuaderno de Banqueros o clip muestra a continuación. (unpainted) Tal vez no sea una mala idea para cubrir los mangos de la pinza con un recubrimiento de goma, algo a lo largo de las líneas de PLASTIDIP.

Paso 2: Montar + ENSAYO
Taladro de 3 agujeros en la cubierta de la Bahía.
Dos, por un lado, aproximadamente 1 / 2 pulgadas de separación Uno sobre el otro lado de la bahía de la cubierta, a través de los otros dos, de preferencia entre ellos. Nos están utilizando sólo la RED (5v) y el NEGRO (GND) cables para ello. Cortar el cable NEGRO y tira de una longitud de la misma en ambos lados de su corte (lo suficiente para soldar). Cortar el cable rojo y hacer lo mismo.
Ahora, coloque el acabado de las uñas (o lo que sea que usted está utilizando) a través de los agujeros de la parte inferior de la Bahía de la cubierta.
La soldadura de ambos extremos del cable NEGRO solitario a la uña. Soldar cada uno de los cables de RED a uno de los clavos.
* PRUEBA SUS CONEXIONES antes de pasar!


Paso 3: Glue que cachorro!
Sólo en el caso de los cables se retiraron los clavos o salir, vamos a llenar el "cuerpo" de la Bahía con la cubierta con la cola de su elección.
Que perder no va en cualquier lugar ahora!


Paso 4: Casi hecho!
Ahora que la mayoría juntos, parece un poco aburrido ...
Vamos a trabajar sobre eso!

Paso 5: Espera
He añadido un pedazo de cinta RED eléctrica a la parte que tiene los pines de voltaje. (sólo en caso de que no soy el uno con la unidad) Y una etiqueta, yo también caliente pegado un pedazo de espuma azul en la parte inferior.

Paso 6: Uso de tensión
Ok, ahora que se trata de poner juntos, aquí está la información sobre cómo usarlo! Para comprobar la tensión, utilizar el cuaderno el clip EN DOS pins que atribuye la RED a los cables (véase el por qué puse la burocracia sobre ellos?)
A continuación, un lugar de su MULTIMETER clips / ganchos / loquesea en una de las clavijas de RED y en el pin NEGRO.
En caso de que usted no sabía, asegúrese de que su ensayo se lleva en la correcta puertos.


Paso 7: Uso actual
- Ahora para ACTUALES, NO IMAGEN. Establezca su MULTIMETER puertos, y adjuntar su conduce a los dos pines, no importa de qué color va a que una.

BTW, no importa si los dispositivos USB está conectado a la corriente en cualquiera de estas etapas o no.
Que se diviertan probando el los puertos y dispositivos!!


Matriz de puntos tarjeta de visita

Si mi linterna tarjeta de visita no es lo suficientemente avanzada para usted, entonces ¿qué tal una con una pantalla gráfica completa sobre lo que puede ser personalizado para una serie de mensajes de desplazamiento? Este podría ser un hecho en la cantidad de alrededor de US $ 5 partes coste, y es sólo un poco más caro si se toma sólo unos pocos. No voy a niño que esta es un diseño fácil de hacer - no lo intente a menos que tenga muy buena habilidad con el soldador y un poco de experiencia en electrónica. Algunos de los componentes aquí son más pequeños que granos de arroz, por lo que sería útil disponer de buena vista como así! Al igual que la linterna tarjeta, es más de una prueba de concepto que algo que usted puede batir en la cantidad, pero podría al menos darles una idea de lo que se puede lograr, y donde las tarjetas de visita podría ser en pocos años.
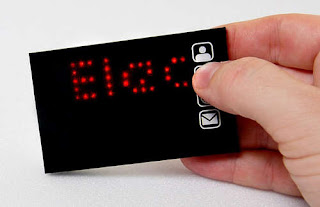
Paso 1: Acerca del Diseño
Este es el tipo de tarjeta que demanda una empresa de alta tecnología, o los que han participado de gran valor los contratos, donde una innovadora imagen es muy importante. Me gustaría pensar que nunca sería reemplazar una tarjeta de visita convencional, pero que para impresionar a tan importante cliente potencial, habría más de unas pocas empresas que estarán encantados de pasar sólo un extra unos cuantos dólares. Al igual que la tarjeta de linterna, el objetivo es diseñar una tarjeta de negocios que la gente simplemente no puede tirar!

descarga MatrixSchematic.pdf
Paso 2: Lo que usted necesita
* Una batería CR2032 (tengo para alrededor de 16 centavos en eBay cuando compró 100)
* Una batería CR2032 titular (I Parte Utilizada 18-3780 de www.rapidonline.com. Esto cuesta alrededor de 14 centavos en cantidades de 100 - se trata de un tipo común de titular que usted debería ser capaz de encontrar en lugares como www.mouser.com si usted está en el otro lado del Atlántico a mí!)
* Un PIC16F57 (Orden de código 1556188 www.farnell.com - Estas costo 66 centavos cada uno en cantidades de 100 + - una vez más, usted puede encontrar en www.mouser.com) Cuatro interruptores de montaje en superficie (Parte 78-1130 de www.rapidonline.com a 20 centavos cada uno)
* Algunos diversas resistencias y condensadores en un "0805" la superficie de montaje en conjunto - tendrá 5x100 ohmios resistencias, 2x10k resistencias, 1x47k resistencia, 1x47p condensador, condensador y 1x100n - cualquiera de los proveedores mencionados anteriormente hacen estos, y que costo casi nada!
* 75x "0603" LEDS - tan brillante como sea posible, y lo más baratos posible! He utilizado el tema 72-8742 a los 6 centavos de cada una de las rápidas, pero una vez más, usted debería ser capaz de obtener en otros proveedores. En cantidad, puede llegar a estos alrededor de 3 centavos cada uno.
* Algunos de doble cara cinta adhesiva de espuma que es ligeramente más gruesa que la batería que está utilizando - mina fue 4.5mm de espesor)
* Una placa de circuito impreso (PCB) para el proyecto - las instrucciones para la producción de su propia están más allá del ámbito de aplicación del presente artículo, pero usted puede tener cierto éxito con el de hierro o de técnica fotográfica (mi preferido técnica). Puede encontrar instrucciones para hacer sus propias placas de circuitos impresos instructables en otros lugares y en otros lugares. El diseño de PCB se reproduce a continuación en un archivo PDF si desea intentar usted mismo.
Usted también necesitará un soldador (además de la soldadura), un cuchillo de corte, algunos spray adhesivo, y una forma de impresión de la parte delantera de su tarjeta de crédito - que usted puede utilizar un láser de color o de inyección de tinta. I impreso en la transparencia OHP película. Necesitará también una forma de la programación del microcontrolador PIC. Yo uso la PICKit2 que forma parte número 579-PG164120 de www.mouser.com, y disponible en alrededor de $ 35. Una franja de 5x0.1 pulgadas PCB pins (como de la rápida 22-0510) pueden ser empujados a un programador para actuar como una interfaz con la Junta.

descarga MatrixPCB.pdf

descarga MatrixPCBMirrored.pdf

Paso 3: Soldadura Comienza!
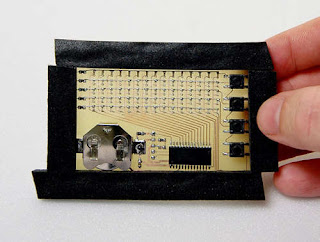
La soldadura de los componentes en la placa, empezando por los más pequeños en primer lugar (Consulte las fotos). Un par de pinzas es útil aquí - por poner una nota de la soldadura sobre una almohadilla y, a continuación, re-fusión, mientras que el posicionamiento de las resistencias o condensadores con las pinzas, puede perfectamente añadir estos pequeños componentes. No importa que forma en torno a estos componentes van, pero sí para el PIC (que debe leer con el escrito la forma correcta como se muestra en estas fotos), y también de los indicadores LED se debe poner alrededor de la manera correcta. Es difícil de decir con los LEDs que se forma en torno a que ir - el principio de conexión debe ser el positivo (o "ánodo"). Usted puede decirle a través de la consulta la hoja informativa para el LED - uno de los dos conduce normalmente será marcado de alguna manera. Una forma más fácil es a veces una prueba de ellos vinculados por un par de cables a una pequeña batería de 1.5V y, a continuación, tocar la lleva en los extremos de los LED - si es la manera correcta de todo, debería ver un resplandor, pero Si se utiliza una única batería de 1.5V, será extremadamente débil, por lo que tendrá que observar cuidadosamente. Una vez más, un tutorial sobre la soldadura no se encuentra dentro del ámbito de aplicación de este artículo - que hice advertir que esta no es una principiante del proyecto, por lo que no hacen de este uno de su primera aventura en la superficie de montaje de soldadura! Tenga en cuenta que los LEDs son soldadas inicialmente sólo en su parte inferior de plomo - vamos a utilizar más tarde algunos cables para conectar su parte superior lleva.


Paso 4: Una ad-hoc bordo de doble cara
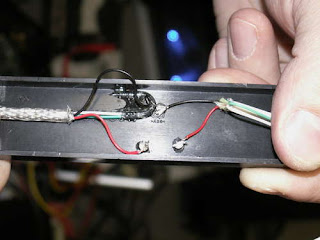
Sentar bien algunas tiras de "cinta invisible 'abajo a lo largo de la traza vertical PCB junto a cada columna de LEDs - esto ayudará a los cables que están a punto de soldadura tocarlos.
A continuación, la soldadura de algunas conservas finas de alambre de cobre a lo largo de la parte superior de cada fila de LEDs, para llegar a todos el camino a la resistencia como en la foto. Tenga en cuenta que tendrá sólo cuatro cables
-- un principio no será necesaria si se utiliza el diseño de PCB en este artículo, ya que utiliza un PCB traza para conectar los componentes.

Paso 5: Programación
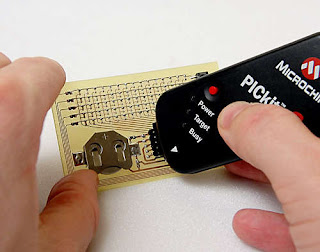
El siguiente paso es poner el programa de marcación en el chip. Si usted ha comprado el Kit 2 PIC programador, tiene todo lo necesario con ella. Descargue el MatrixCode.zip archivo de esta página, descomprimir y ponerlo en un directorio en su ordenador - a partir de entonces en el MPLAB IDE, vaya a el "Proyecto", seleccione "Abrir", y navegar a la "main.asm" archivo. Cambie el almacenados los mensajes (cerca de la línea 115 en el código) a sus datos de contacto en lugar de la mina (!) - Los mensajes se definen con una serie de
'1 'Y'0 s' s - un'1' significa que el LED está encendido. Si se mira de cerca, verás mi nombre enuncia con'1 's. (Es posible que tenga que girar la cabeza 90 grados para ver esto!) Usted tiene total libertad para hacer su propia caracteres o símbolos, por lo que podría tener, por ejemplo, una simple animación de un coche en movimiento a la izquierda si quería. Tenga en cuenta que existe son cuatro mensajes - uno para cada botón - tendrá que especificar la longitud de cada mensaje indicando el número de columnas que ocupa en la "MSG1LEN, MSG2LEN ..." definiciones.
Ir a el "proyecto" de nuevo menú, y seleccione "Quickbuild" - comprobar que no hay errores, y usted está listo para programar. Yo uso una simple técnica de la inserción de un roto-off franja de 5 pines de una franja de 0,1 "de cabecera pins en el programador y, a continuación, sólo tocar los 5 pines, mientras que la programación. Esto es un poco fiddly, pero como el programa de borrar o ciclo Sólo se tarda un segundo o así, es muy manejable. La flecha en el extremo de la patilla programador debe alinearse con la parte superior de la pin PCB (NO como se muestra en esta FOTO - ¡Vaya!) Si usted está experimentando, es así de soldadura por valor de la franja de 5 pines en la placa hasta que haya terminado sus cambios. Cuando esté listo para el programa, usted tendrá que utilizar las "PICKIT2" utilidad suministrado con el programador, ya que por alguna razón, el MPLAB IDE no es compatible con la programación de la PIC16F57 directamente. Para ello, es necesario specifify la familia de países insulares del Pacífico ( "de referencia"), y la parte (16F57), antes de cargar el archivo HEX creado en el anterior paso y, a continuación, por último, la programación del chip. Si todo es correcto, debería ser capaz de insertar la batería (positivo hacia abajo), y pulse uno de los botones para ver el mensaje de desplazamiento a lo largo de!


descarga MatrixCode.zip

Paso 6: Fuera de acabado
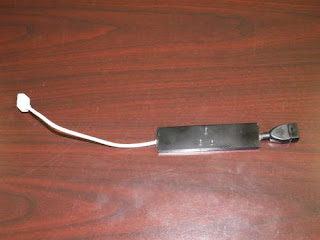
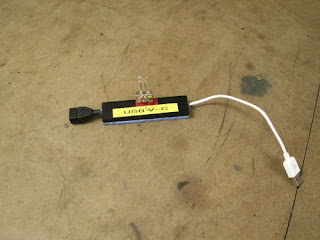
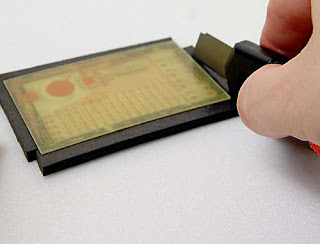
Para encapsular el prototipo, He aplicado algunos de espuma de doble cara cinta a la Junta, que resultó al revés y, a continuación, cortar el exceso de compensación. I-luego invertir el gráfico impreso en una superposición de transparencia OHP hoja. Girando sobre la hoja, y adjuntar una etiqueta de color blanco impresora, puede obtener la clara iconos de la transparencia se presenta de color blanco. También se adjunta una hoja de polipropileno de espesor (como hizo una cobertura de los documentos vinculantes) a la superposición de la utilización de algunas spray adhesivo, antes vinculados a la parte frontal de la tarjeta y recortar el exceso de despegue. Si desea utilizar el mismo gráfico como el mío, que también está disponible en esta página como un PDF.


descarga MatrixOverlay.pdf
Paso 7: El producto terminado
El producto terminado se muestra a continuación. Usted puede ahora relajarse, el contenido que usted tiene el más avanzado del mundo tarjeta de visita (al menos hasta que yo haga mi próximo uno que tendrá una pantalla OLED en color!)
Paso 8: El Futuro
Si me producidos comercialmente estas, yo probablemente cambiar un par de cosas. En primer lugar me gustaría cambiar el CR2032 celda a una CR2016 como esta es más delgada y, a continuación, incrustar dentro de un espacio de corte en el PCB. Mediante el uso de menor perfil de los componentes, el espesor de la tarjeta probablemente podría reducirse a unos 1/8th de una pulgada (en lugar de la actual 1 / 4 de pulgada). Mediante el uso de algunos de la nueva película delgada baterías, que incluso podría ser posible hacer una tarjeta flexible, aunque a un precio más elevado. A profesionalmente impreso de superposición de una costumbre y troquelados para sustituir a la cinta de espuma que ver las cartas montadas mucho más rápidamente, y busque una slicker demasiado poco. Por supuesto, el PCB se fabrican así como profesionalmente, y poblada por una "selección y el lugar 'robot para permitir el montaje que se acelera aún más.


Understanding Java ME

The Java Micro Edition ( Java ME) is the version of the Java platform that’s designed for use with small devices such as cell phones, personal digital assistants (PDAs), TV set-top boxes (for web browsing and e-mail without a whole computer), and embedded devices. Since these devices vary quite a bit in their capabilities, the Java ME platform has two different configurations, each with its own choice of profiles. The Connected Limited Device Configuration (CLDC) is the configuration you’ll be working with in this book. It’s designed for cell phones and lowlevel PDAs. More precisely, CLDC is intended for devices with a 16-bit or 32-bit processor, with at least 160KB of nonvolatile memory, at least 32KB of volatile memory, and some network connectivity, possibly wireless and intermittent. CLDC’s unique profile is the Mobile Information Device Profile (MIDP). This book covers MIDP versions 1, 2, and 3, although the focus will be on MIDP 2 since that is the current industry standard for cell phones and will continue to be the standard for some time. The other configuration possibility associated with Java ME is the Connected Device Configuration (CDC), which isn’t specifically covered in this book. Starting with MIDP 3, some CDC devices will be able to run MIDP applications; however, from the MIDP application’s perspective, the configuration must behave as if it were CLDC, and therefore, no CDC-specific programming is covered here.
The configuration specifies the type of Java Virtual Machine (JVM) that’s used and what will be included in the minimal class libraries (the java.* packages and the javax.microedition.io package in the case of CLDC). CDC specifies a complete JVM, but the JVM of CLDC has some limitations compared to the standard JVM. A profile is added on top of the configuration to define a standard set of libraries (the other javax.microedition.* packages in this case). MIDP contains packages for application lifecycle, a user interface, media control, input/output, data storage, and security.
In addition to its configuration and profile, a Java ME–capable device may also have a set of optional application programming interfaces (APIs) available. Some are proprietary, but many are standard. Standard optional APIs are defined in Java Specification Requests (JSRs), which are
submitted, reviewed, and published through the Java Community Process (JCP). You can download the precise specifications for any JSR (free) from the JCP web site (http://jcp.org/). CLDC, CDC, and MIDP are all defined as JSRs through the Java Community Process.

How the CLDC Differs from the Rest of the Java Universe

If you’re coming to Java ME from a background of programming for Java Standard Edition (Java SE) or Java Enterprise Edition (Java EE), things should look pretty familiar, but just a little bit different. It’s like Java in a parallel universe where everything has been streamlined to be as small and efficient as possible. You have fewer tools at your disposal in terms of built-in libraries, and you need to place greater priority on writing tight, efficient code than a Java SE or Java EE developer would. Those are already good reasons to switch to Java ME if you’re one of those people who loves a good challenge. Another motivation for making the switch to Micro Edition is that the applications are so small that you typically get to design most or all of the program yourself instead of being a cog writing a part of an obscure module.
The designers of the CLDC specification have made an effort to make CLDC resemble the standard platform as closely as possible, and they’ve done a pretty good job of it. Nothing critical to small applications appears to be missing. I’ll give a general outline of the changes here, and I’ll refer you to later chapters in this book for a more in-depth discussion of the aspects that have changed the most dramatically.

Differences in the JVM
The JVM specified in CLDC is mostly the same as the standard JVM. Unsurprisingly, a few of the costlier noncritical features have been eliminated. One example is the method Object.finalize(). According to the JavaDoc, the Object.finalize() method is called on an object when the JVM determines that it’s time to garbage-collect that object. The actions the object can take in its finalize() method aren’t restricted, so in particular it can make itself available again to currently
active threads! The garbage collection algorithm is already expensive, and this method clearly undermines its efficiency by obligating the JVM to recheck objects that had already been marked as garbage. It’s no wonder this method was eliminated in CLDC, since it’s not hard at all to keep track of the objects that you’re still using without requiring the JVM to check with you before throwing anything away.
Some of the other areas where the JVM’s set of features have been reduced are in security, threads, and exceptions/errors. See the “Understanding Protection Domains and Permissions” section in Chapter 8 for a discussion of the differences in the security model. See the “Differences
Between CLDC Threads and Threads in Standard Java” section in Chapter 4 for information about threads. The changes in the error-handling system are that CLDC doesn’t allow asynchronous exceptions and that the set of error classes has been greatly reduced. Instead of 22 possible errors, you now have only OutOfMemoryError, VirtualMachineError, and Error. On the other hand, almost all the exceptions in the java.lang.* package have been retained.

You may not notice a few changes to the JVM just by looking at the API. In CLDC, the JVM is allowed to perform some optimizations (such as prelinking classes) that were disallowed to the standard JVM. Such changes shouldn’t concern the application programmer in general. The one exception is that an additional preverification stage has been added after compilation. The preverification process adds extra information to the class file to make the bytecode verification
algorithm easier at runtime when the device checks that your class file is valid before using it. You easily accomplish the preverification step with standard tools (see the “Using KToolbar” section and the “Building with Ant” sidebar later in this chapter). Preverification isn’t technically required 100 percent of the time, but it aids in compatibility, and there’s no reason not to do it.
One more general item to be aware of is that although a CLDC-compliant platform is required to support Unicode characters, it’s required to support only the International Organization for Standardization (ISO) Latin 1 range of characters from the Unicode standard, version 3.0. For more information about character encoding in Java, see http://java.sun.com/ javase/6/docs/technotes/guides/intl/encoding.doc.html. Also, the initial version of CLDC (1.0) did not include floating-point numbers as simple data types (double and float). These were added in the newer version, CLDC 1.1.

Select good PHOTO OPPORTUNITIES

Unless you have specific reasons to shoot particular scenes or subjects, the best photo opportunities for you are those things that you enjoy. If you enjoy gardening and appreciate the thousands of different variations of iris, shoot irises. Or if you are a birdwatcher and find pleasure in watching wildlife, choose places where you can find birds and other wildlife in settings that make great photographs. When planning a trip, give yourself plenty of time to stay and take photographs. Allow yourself some time for bad weather or other shooting conditions that prevent you from photographing. You can spend an entire day or more at a site and not have good enough light to shoot. Do not fall into the trap of trying to see too much too quickly. You may miss the kinds of shots that you had hoped to capture because you saw everything and shot little. Photography takes time, and time is often the most important factor in getting truly great photographs.
-- When shooting well-known places such as the Grand Canal in Venice or Canyon de Chelly in Arizona, take classic photos and then shoot creatively, too.


-- It took several hours of waiting to get a shadow on this otherwise overly bright photograph of the White House ruins in Canyon de


-- Chelly in Arizona. If you are willing to hike, you may be rewarded with photos that are well worth the effort that it took to get there.


-- This small backyard pond offers many subjects to photograph. Being close to home, it is easy to pick the best light to shoot in.

-- This frog was sunning on a rock on the edge of the pond shown in the preceding photo.

Photo Tip!
When you find a good place to take photographs, visit it again and again. Your photographs will improve each time that you return to the location because you will learn when to visit and what to shoot.

Did You Know?
Some of the best photo opportunities may be in your own backyard. Learn to see differently and look for details, shapes, or colors that make good photographs and then capture them.


Photo Tip!
Use the Internet to learn where and when to shoot. There are many online guides and forums that provide all the information you need to find wonderful places and subjects to shoot that will suit your interests.

KNOW WHY you are taking photos

Should you shoot horizontally or vertically? If you have a choice of digital cameras, which one should you use? What camera settings will you use? Will your photographs be framed or displayed on a Web page? Are you going to display your photographs in a series, or should they be shot in a particular style? Are you shooting to get backgrounds or objects to include in another photograph? Do you plan to digitally edit your photographs with an
image editor such as Adobe Photoshop after you take them?
Your answers to these questions and others like them will have a substantial impact on how you should shoot. Knowing why you are taking photos before you take them can help you get the photos that you want. For example, suppose you make a once-in-a-lifetime trip and get excellent pictures. You then decide to make a calendar but cannot find enough photos to fit the horizontal format that you have chosen. Thinking about why you are taking the photographs and how they are likely to be viewed can help you to better plan your photographs.


This photo of a green anole was
taken so that it could be used in
a variety of media.


Minor cropping enables the
photo to be displayed in a Web
browser-based photo gallery.


Vertical orientation and
composition makes it
possible to frame this
photo in standard-sized
photo frames and mat
boards.


Good cover design allowed the leaf on the
left side of the photo to be used for the
magazine’s cover text.

The lnternet and e-commerce


The Internet service provider or ISP is the organization that provides you with Internet access. You register and open an account, then they give you an email address so that you can communicate by email with other users. (See Unit 53) Some ISPs have their own content - news, information and so on - but many do not. After you log on by entering your user name and password (a secret word that only you know), you can surf to any site on the World Wide Web. If you're looking for a site about a particular subject, you can use a search engine like Google or Yahoo. When you've finished, remember to log off for security reasons.

Clicks-and-mortar
My name's John, and I own a chain of sports shops. Last year, I started an e-commerce operation, selling goods over the Internet. We've done well. Visitors don't have trouble finding what they want, adding items to their shopping cart and paying for them securely by credit card. Last year we had two million unique users (different individual visitors) who generated 35 million hits or page views. That means our web pages were viewed a total of 35 million times! E-commerce or e-tailing has even acted as a form of advertising and increased levels of business in our traditional bricks-and-mortar shops! Pure Internet commerce operations are very difficult. To succeed, I think you need a combination of traditional retailing and e-commerce: clicks-andmortar. In our case, this has also helped us solve the last mile problem, the physical delivery of goods to Internet customers: we just deliver from our local stores!

B2B, B2C and B2G
Selling to the public on the Internet is business-to-consumer or B2C e-commerce. Some experts think that the real future of e-commerce is going to be business-to-business or B2B, with firms ordering from suppliers over the Internet. This is e-procurement.
Businesses can also use the Internet to communicate with government departments, apply for government contracts and pay taxes: business-to-government or B2G.

Marketing


Marketing is the process of planning, designing, pricing, promoting and distributing ideas, goods and services, in order to satisfy customer needs, so as to make a profit. Companies point out how the special characteristics or features of their products and services possess particular benefits that satisfy the needs of the people who buy them. Non-profit organizations have other, social, goals, such as persuading people not to smoke, or to give money to people in poor countries, but these organizations also use the techniques of marketing.
In some places, even organizations such as government departments are starting to talk about, or at least think about their activities in terms of the marketing concept.

The four PS
The four PS are
product: deciding what to sell
price: deciding what prices to charge
place: deciding how it will be distributed
and where people will buy it
promotion: deciding how the product will
be supported with advertising, special
activities, etc.
A fifth P which is sometimes added is packaging: all the materials used to protect and present a product before it is sold.
The four PS are a useful summary of the marketing mix, the activities that you have to combine successfully in order to sell. The Promotion next four units look at these activities in detail. To market a product is to make a plan based on this combination and put it into action. A marketer or marketeer is someone who works in this area. (Marketer can also be used to describe an organization that sells particular goods or services.)

Market orientation
Marketers often talk about market orientation: the fact that everything they do is designed to meet the needs of the market. They may describe themselves as marketdriven, market-led or market-oriented. Most people and many managers do not understand the role of marketing in modem business.
Marketing is two things. First, it is a strategy and set of techniques to sell an organization's products or services. This involves choosing target customers and designing a persuasive marketing mix to get them to buy. The mix may include a range of brands, tempting prices, convenient sales outlets and a battery of advertising and promotions. This concept of marketing as selling and persuasion is by far the most popular idea among both managers and the public.
The second, and by far more important concept of marketing, focuses on improving the reality of what is on offer. It is based on understanding customers' needs and developing new solutions which are better than those currently available. Doing this is not a marketing department problem, but For example, for Rover to beat Mercedes for the consumer's choice involves engineering new models, developing lean manufacturing processes, and restructuring its dealer network. one which involves the whole organization
Creating company-wide focus on the customer requires the continual acquisition of new skills and technology. Marketing is rarely effective as a business function. As the chief executive of Hewlett Packard put it: 'Marketing
is too important to leave to the marketing department.' Such companies understand that everybody's task is marketing. This concept of marketing offering real customer value is what business is all about.

IT’S A LONG JOURNEY – YOUR ULTIMATE AIM SHOULD BE TO SET-UP NOT ONE BUT SEVERAL INCOME STREAMS…ALL PULLING IN MONEY FOR YOU 24/7


I’d like to share with you a few simple wealth building concepts that have worked extremely well for me. Just as building a plan is important to condition yourself for success, of equal importance is developing the correct mindset.
Mindset One Aiming For Your Own Business Instead Of Being An Employee
Have you heard the common belief that a job is far more secure than having your own business? For some reason this myth is conditioned into many people, usually from a young age. Yes, a job provides a stable and predictable income but more secure than having your own business? I don’t think so…and allow me to elaborate.
As someone who lives in the UK and who has worked in one of the worlds leading investment banks I am only too well aware of how fickle “job security” actually is. You see, as an employee your entire purpose is to create or save revenues for the company. There is nothing wrong with that of course, but let’s analyse it from your point of view shall we? As an employee you can never expect to earn the actual value that you make or save for your company. Most of your efforts will be reaped by shareholders of the organization you work for…people who you do not even know. When the going is good the most you can expect a modest pay-rise/bonus now and again and the odd promotion (that brings even greater responsibility).
But when the times get hard you may notice that not only does your pay-rise stop but in many cases you are required to work even harder. That’s if you’re lucky. Unfortunately for many people, they quickly find that job security simply does not exist many will face redundancy at some point in their life. Then what? They have only one skill chances are if the company they work for is shedding jobs so will others in the same industry.
All of a sudden the employee who thought they were safe in a decent job is left on the shelf fighting to get another elusive jobs among hundreds (sometimes more) of competing employees. Where is the security there?
Then there is the small matter of tax. As an employee you will earn money, get taxed on your earnings and then use whatever is left to pay for living expenses and so on. Not so for the business owner (I am talking about the UK here and I suspect the US too). You see, a business is one of the secret weapons of the rich. A business makes revenues (the equivalent of an employees salary) and then deducts every possible expense related to that revenue before paying even a penny of tax. Can you see the beauty of this? Just a few things that can be written off against business profits include the following:
• Computers & equipment required for your home business.
• Travel costs (including local plus international flights/hotel when used for business purposes).
• Broadband costs.
• Office space.
• Entertainment expenses if your business involves courting new clients.
• Employee salary (you may work for your business and thus are entitled to pay yourself a salary).
An employee could never do this. For example, even if as an employee you have a PC you cannot write it off against your income tax. There is an outstanding book called “Rich Dad, Poor Dad” that I strongly recommend that you get hold of. Read it once, twice, several times even. The basic premise of the book is the following…the poor and middle classes work for companies while the rich own companies.
Mindset Two – Multiple Streams Of Income Are Far Better Than Just One
We are fortunate enough to live in an age where almost anyone can set-up highly profitable income streams from their own study room. What is the most re
producing a large income stream? Have a number of different income streams all pulling in some cash for you each and everyday. This is very achievable and also presents a lot of security (in case in the future one of the income streams dries up).
Mindset Three Education, Education, Education!
You know the old saying “knowledge is power?” it has never been more true, especially as we are now firmly entrenched in the “information age”. The simple fact is that the more you educate yourself on different ways of making money, the more successful you will become at acquiring it. You are reading a really premium resource on ways of making money from home but even after you have finished reading, make it a point to continue your education on a regular basis. I know of some people who make absolute fortunes online and they all share one interesting characteristic the desire to learn more about the various ways of earning an income. Adopt this mentality and it will be only a matter of time before success and wealth hounds you down and forces itself on you. If you do thrive on video tutorials then check out some of these incredible online video tutorials. They would cost you over $200 if purchased separately (but are part of your membership with Instant Home Wealth).
Now we’re going to look at some of the proven ways that we can use to create income streams online, and from home.
Mindset Four Develop A Winning Mind
This one is huge the power of thought is absolutely incredible. If harnessed correctly, it WILL provide you with everything you could possibly ask for in life. Conversely, if used negatively it has the power to crush even the mightiest person.
Have you heard of a fellow named Jim Edwards? He is a very successful and influential online guru who has made a fortune earning a living using the power of the internet. A short while ago I signed up to his audio course called “Guaranteed Success Thinking”. This course shows anyone how to think their way to success. As Jim himself says, this information should really be sold at $29 at least however you can get hold of it for free below: liable and easiest way of

IT’S A LONG JOURNEY – YOUR ULTIMATE AIM SHOULD BE TO SET-UP NOT ONE BUT SEVERAL INCOME STREAMS…ALL PULLING IN MONEY FOR YOU 24/7

I’d like to share with you a few simple wealth building concepts that have worked extremely well for me. Just as building a plan is important to condition yourself for success, of equal importance is developing the correct mindset.
Mindset One – Aiming For Your Own Business Instead Of Being An Employee
Have you heard the common belief that a job is far more secure than having your own business? For some reason this myth is conditioned into many people, usually from a young age. Yes, a job provides a stable and predictable income – but more secure than having your own business? I don’t think so…and allow me to elaborate.
As someone who lives in the UK and who has worked in one of the worlds leading investment banks I am only too well aware of how fickle “job security” actually is. You see, as an employee your entire purpose is to create or save revenues for the company. There is nothing wrong with that of course, but let’s analyse it from your point of view shall we? As an employee you can never expect to earn the actual value that you make or save for your company. Most of your efforts will be reaped by shareholders of the organization you work for…people who you do not even know. When the going is good the most you can expect a modest pay-rise/bonus now and again and the odd promotion (that brings even greater responsibility).
But when the times get hard you may notice that not only does your pay-rise stop but in many cases you are required to work even harder. That’s if you’re lucky. Unfortunately for many people, they quickly find that job security simply does not exist – many will face redundancy at some point in their life. Then what? They have only one skill – chances are if the company they work for is shedding jobs so will others in the same industry.

All of a sudden the employee who thought they were safe in a decent job is left on the shelf fighting to get another elusive jobs among hundreds (sometimes more) of competing employees. Where is the security there?
Then there is the small matter of tax. As an employee you will earn money, get taxed on your earnings and then use whatever is left to pay for living expenses and so on. Not so for the business owner – (I am talking about the UK here and I suspect the US too). You see, a business is one of the secret weapons of the rich. A business makes revenues (the equivalent of an employees salary) and then deducts every possible expense related to that revenue before paying even a penny of tax. Can you see the beauty of this? Just a few things that can be written off against business profits include the following:
• Computers & equipment required for your home business.
• Travel costs (including local plus international flights/hotel when used for business purposes).
• Broadband costs.
• Office space.
• Entertainment expenses if your business involves courting new clients.
• Employee salary (you may work for your business and thus are entitled to pay yourself a salary).
An employee could never do this. For example, even if as an employee you have a PC you cannot write it off against your income tax. There is an outstanding book called “Rich Dad, Poor Dad” that I strongly recommend that you get hold of. Read it once, twice, several times even. The basic premise of the book is the following…the poor and middle classes work for companies while the rich own companies.
Mindset Two – Multiple Streams Of Income Are Far Better Than Just One
We are fortunate enough to live in an age where almost anyone can set-up highly profitable income streams from their own study room. What is the most re
producing a large income stream? Have a number of different income streams all pulling in some cash for you each and everyday. This is very achievable and also presents a lot of security (in case in the future one of the income streams dries up).
Mindset Three – Education, Education, Education!
You know the old saying “knowledge is power?” – it has never been more true, especially as we are now firmly entrenched in the “information age”. The simple fact is that the more you educate yourself on different ways of making money, the more successful you will become at acquiring it. You are reading a really premium resource on ways of making money from home – but even after you have finished reading, make it a point to continue your education on a regular basis. I know of some people who make absolute fortunes online and they all share one interesting characteristic – the desire to learn more about the various ways of earning an income. Adopt this mentality and it will be only a matter of time before success and wealth hounds you down and forces itself on you. If you do thrive on video tutorials then check out some of these incredible online video tutorials. They would cost you over $200 if purchased separately (but are part of your membership with Instant Home Wealth).
Now we’re going to look at some of the proven ways that we can use to create income streams online, and from home.
Mindset Four – Develop A Winning Mind
This one is huge – the power of thought is absolutely incredible. If harnessed correctly, it WILL provide you with everything you could possibly ask for in life. Conversely, if used negatively it has the power to crush even the mightiest person.
Have you heard of a fellow named Jim Edwards? He is a very successful and influential online guru who has made a fortune earning a living using the power of the internet. A short while ago I signed up to his audio course called “Guaranteed Success Thinking”. This course shows anyone how to think their way to success. As Jim himself says, this information should really be sold at $29 at least – however you can get hold of it for free below: liable and easiest way of